Budget Cam Model Setup Guide
The cam modeling industry has exploded in recent years, offering a unique opportunity for individuals to connect with a global audience and earn a substantial income from the comfort of their own homes. However, a common myth persists that success in this field requires thousands of dollars in high-end cameras, professional studio lighting, and expensive studio space. This couldn't be further from the truth. While high-quality production can enhance a stream, the heart of camming is genuine human connection. Viewers are not tuning in for a Hollywood film; they are seeking authentic interaction, engaging conversation, and a real personality that makes them feel valued. Your charm, wit, and ability to connect are your most valuable assets, and they cost nothing.
This guide is designed specifically for the aspiring model who wants to start on the right foot without breaking the bank. We will walk you through a practical, budget-conscious approach to building your first cam model setup. From finding the perfect lighting using items you likely already own, to selecting free or low-cost software that makes you look and feel like a pro, we cover it all. The goal is to help you launch your career with minimal financial risk, allowing you to reinvest your earnings as you grow. By the end of this guide, you will have a clear, actionable plan to create a warm, inviting, and visually appealing space that attracts viewers and maximizes your earning potential from day one, all while keeping your wallet happy.
Essential Gear Under $100
When you are starting as a cam model, it is tempting to rush out and buy the most expensive 4K camera or a Hollywood-style lighting kit. However, on a tight budget, you need to be strategic. The good news is that for under $100, you can assemble a starter kit that produces a crystal-clear, professional-looking stream. Here is the essential gear you need to prioritize and how to stretch every dollar.
1. The Heart of Your Setup: The Webcam
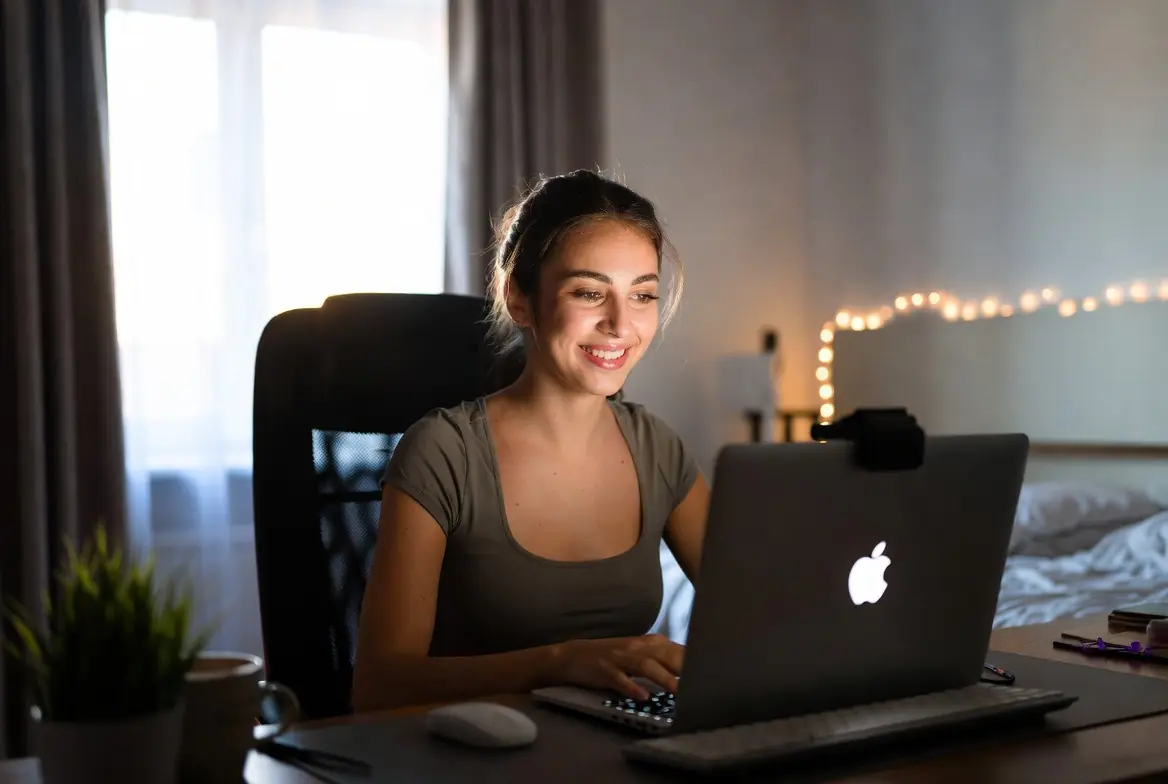
Your webcam is your most important tool. While your laptop's built-in camera might be convenient, it usually delivers grainy, low-light video that viewers will scroll past. The industry standard for budget streaming is the Logitech C920s or C922x. These webcams output true 1080p video and handle different lighting conditions well. You can often find these models refurbished or on sale for around $50-$60.
Budget Alternatives: If the C920 is out of stock, look for the Logitech C615 or Microsoft LifeCam Studio. They offer similar quality for often $10-$20 less. Check sites like eBay, Facebook Marketplace, or Craigslist for used models, but ensure the lens is scratch-free before buying.
2. Lighting: The Secret to Looking High-End
Good lighting makes a cheap webcam look expensive. Bad lighting makes an expensive webcam look cheap. You do not need a professional softbox kit. For under $20, you can create lighting that mimics a professional studio.
The DIY Ring Light: Purchase a cheap clamp work light from a hardware store (the kind with a metal reflector) and combine it with a 5000k (Daylight) LED bulb. Daylight bulbs are crucial because they mimic natural light and prevent the yellow, dingy look of household bulbs. Position this light slightly above and directly behind your webcam to create a "ring light" effect that softens skin tones and adds a sparkle to your eyes.
The Two-Lamp Setup: Buy two desk lamps or clamp lights and fit them with daylight CFL or LED bulbs. Place them at 45-degree angles to your face, slightly above eye level. This setup eliminates shadows and provides even, flattering illumination. Total cost for bulbs and lamps: Usually under $30.
3. Internet Stability: Your Cash Flow Lifeline
You can have the best camera in the world, but if your stream buffers or disconnects, you lose viewers and money. While the internet bill itself is a recurring cost, optimizing what you have is free.
Wired Connection: If your router is near your streaming space, use an ethernet cable. It is more stable than Wi-Fi. If you must use Wi-Fi, position your computer as close to the router as possible.
Speed Optimization: Before you go live, close all other programs, browsers, and apps on your computer and any devices connected to your Wi-Fi (like Netflix on your TV). Use a tool like Speedtest.net to check your upload speed. For 1080p streaming, you want at least 5 Mbps upload. If your speed is lower, reduce your stream resolution in your broadcasting software to 720p, which still looks professional.
Where to Find the Deals
Do not pay full price. Check Amazon Warehouse for open-box deals on electronics. Visit local thrift stores for desk lamps. For the bulbs and basic hardware supplies, dollar stores and hardware stores often have the best prices. By investing your first $100 wisely in these three areas, you build a foundation that looks professional and allows you to start earning immediately.
DIY Lighting and Background Hacks
You don't need a Hollywood studio budget to achieve professional-looking lighting for your cam shows. With a bit of creativity and some household items, you can create a setup that makes you look your best. Great lighting is the secret to a high-quality stream, and a clean, appealing background keeps the focus on you. Here are some step-by-step hacks to get you started.
Harness the Power of Natural Light
Your cheapest and most flattering light source is often right outside your window. Natural daylight provides a soft, even glow that cameras love.
- Find your window: Position your desk or camera setup facing a window. The light should fall on your face, not behind you (which would turn you into a silhouette).
- Timing is everything: The "golden hours" (early morning or late afternoon) offer the warmest, softest light. Midday sun can be harsh, so diffuse it with a thin white curtain or a white sheet.
- Bounce the light: Use a white foam board or even a large piece of white poster board placed opposite the window to bounce light back onto the shadow side of your face, filling in harsh lines.
The Cardboard Box Softbox
A softbox diffuses light to eliminate harsh shadows. Buying one can be expensive, but making one is almost free.
- Materials: A medium-to-large cardboard box, a white bed sheet or white trash bag, aluminum foil, tape, and a desk lamp with an LED bulb (daylight bulbs are best).
- Instructions:
- Cut the flaps off the top of the box. Cut a hole in the bottom of the box just big enough for the head of your lamp to fit through.
- Line the inside of the box with aluminum foil (shiny side out) to maximize brightness. Tape it in place.
- Cut a piece of your white sheet or plastic bag large enough to cover the open top of the box. Stretch it tight and tape it securely around the edges.
- Insert your lamp into the hole at the bottom. The light will shoot up into the box and out through the white fabric, creating a beautifully diffused, soft light.
Mastering Lamp Placement for Flattering Shadows
You don't need three-point lighting kits. You can achieve a professional look with just two or three standard desk lamps.
- The Key Light: This is your main light. Place your brightest lamp at a 45-degree angle to your face, slightly above eye level, pointing downwards. This creates depth and shape.
- The Fill Light: Place a second, less powerful lamp on the opposite side of your face (another 45-degree angle) to soften the shadows created by the key light. If you don't have a second lamp, use the white foam board trick mentioned earlier to bounce light back.
- The Backlight (Hair Light): If you have a third lamp, place it behind you and slightly off to one side, pointing at your shoulders and hair. This separates you from the background and adds a professional "glow."
- Bulb choice: Use "daylight" LED bulbs (5500k-6500k) for a clean, white light. Avoid "soft white" bulbs which can look yellow on camera.
Creating an Appealing Background with What You Own
Your background is part of your brand. It doesn't have to be fancy, just intentional.
- The Clean Wall: A simple, clean, painted wall is the most professional and clutter-free option. It ensures all the focus is on you. Add a single piece of simple art or a tapestry for a pop of color.
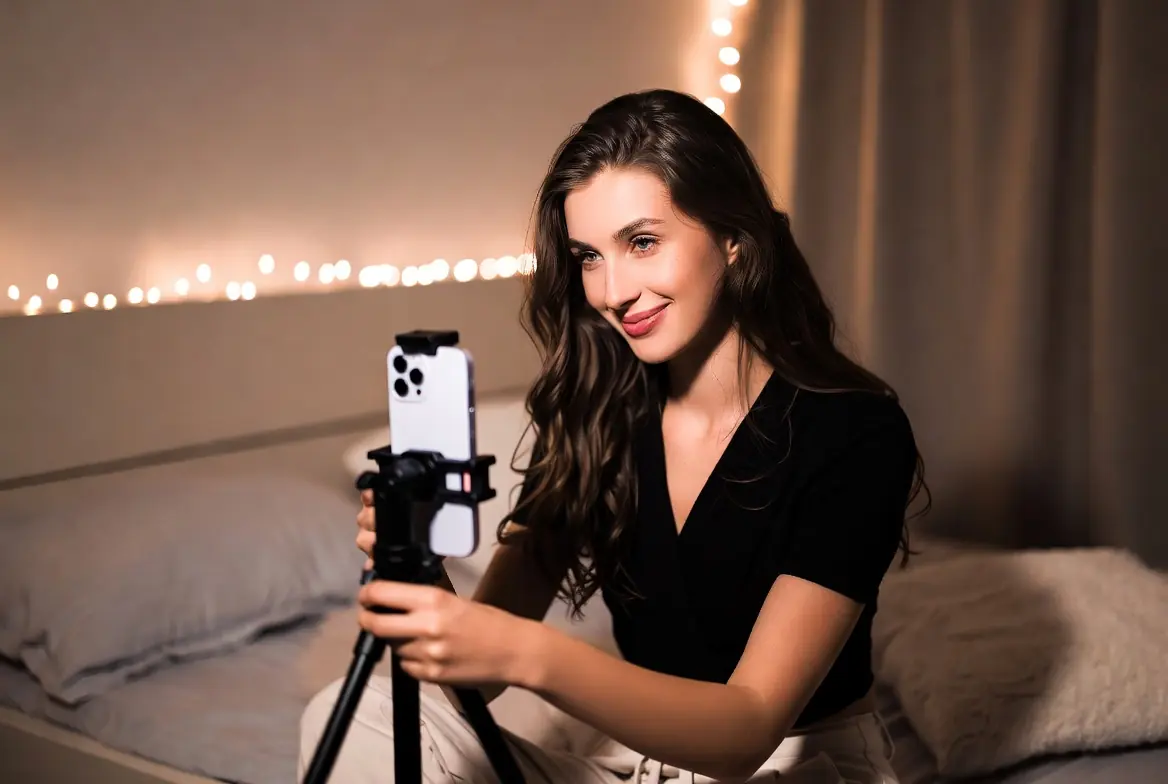
- Fairy Lights: A string of warm-white fairy lights draped behind you or pinned to the wall in a soft curve adds a magical, cozy, and sensual bokeh effect (blurry lights) that looks expensive but costs very little.
- Posters and Tapestries: Band posters, movie posters, or a colorful tapestry can instantly define your personality and fill a large wall space cheaply. Just make sure they are securely fastened and not wrinkled.
- Books and Plants: A neat stack of books on a small shelf or a few real or artificial plants in the background can create a warm, intellectual, or earthy vibe. It makes the space feel lived-in and inviting.
- Fabric Draping: A length of satin, velvet, or chiffon fabric pinned artfully to the wall behind you creates a soft, sensual, and professional-looking backdrop for just a few dollars.
Remember, the goal is to look intentional. Take a test video, look at your background, and ask yourself, "Does this add to the mood?" If it's distracting or messy, simplify it. With these hacks, you can build a high-quality, attractive setup without breaking the bank.
Free and Low-Cost Software Tools
When you're just starting out, every dollar counts. The good news is that you don't need expensive, proprietary software to produce a high-quality stream or edit engaging content. The right free tools can help you look like a pro while keeping your startup costs near zero. Here are the best free and low-cost software solutions to power your cam model setup.
1. Broadcasting Software: OBS Studio (Free)
OBS Studio (Open Broadcaster Software) is the industry standard for live streaming, and it's completely free and open-source. It's powerful, customizable, and works on Windows, Mac, and Linux. Here's how to configure it for the best performance on a budget:
- Download Safely: Always download OBS directly from the official website (obsproject.com) to avoid malware or bundled adware.
- Initial Setup: Run the Auto-Configuration Wizard (found under the Tools menu). OBS will test your system and internet connection to recommend the best streaming settings for your hardware.
- Video Settings: For most new streamers, aim for a base resolution of 1920x1080 and an output resolution of 1280x720 (720p). This balances video quality with performance, ensuring your stream doesn't lag or drop frames.
- Bitrate: If your internet upload speed allows, set your video bitrate to 4500-6000 kbps for 1080p, or 2500-3500 kbps for 720p. You can check your speed for free at speedtest.net.
- Scenes and Sources: Use OBS's scene system to create different layouts (e.g., a "Main Cam" scene and a "Close-Up" scene). Add your webcam as a "Video Capture Device" source.
2. Video Editing: DaVinci Resolve (Free)
For creating pre-recorded content, clip compilations, or promotional teasers, DaVinci Resolve is the best free video editor available. It offers professional-grade color correction, audio editing, and visual effects that rival software costing hundreds of dollars. While it has a steep learning curve, there are countless free tutorials on YouTube to help you master the basics.
3. Audio Tools: Audacity (Free)
Good audio is just as important as good video. Audacity is a simple, free audio editor that lets you record voiceovers, remove background noise, and clean up your audio files before adding them to a video.
4. Music and Overlays (Free Models)
Using copyrighted music on a commercial stream can get you in trouble. Stick to royalty-free sources to keep your content safe and legal.
- StreamBeats by Harris Heller: A massive library of copyright-free music specifically designed for streamers. It's free for anyone to use.
- Canva: While Canva has paid tiers, the free version is excellent for creating simple overlays, stream panels, and social media graphics. You can also find free overlay templates on sites like Streamlabs or OWN3D (be sure to check the licensing terms).
- Pixabay and Pexels: Great sources for free stock video and images to use as backgrounds or in your promotional content.
5. How to Avoid Scams When Downloading
When you're hunting for free tools, the internet can be a minefield of malicious downloads. Protect yourself with these golden rules:
- Stick to Official Sources: Never download software from third-party download sites like "Softonic" or "CNET Download.com." Always go to the developer's official website.
- Read the Fine Print: During installation, choose "Custom" or "Advanced" installation. Uncheck any boxes offering to install toolbars, browser extensions, or other "offers."
- Use an Ad-Blocker: This helps prevent you from accidentally clicking on fake "Download" buttons that lead to malware.
- Keep Antivirus Active: Ensure Windows Defender (or a free alternative like Bitdefender) is running and up to date.
By leveraging these free tools, you can create a professional-looking stream and polished videos without spending a dime on software. This allows you to reinvest your first earnings into better gear or marketing.
Maximizing Your Existing Tech
Before you spend a dime on new equipment, take a close look at the powerful tools you already own. Most new models underestimate the potential of their current devices. With a few clever tricks and free software, your smartphone and computer can form the backbone of a professional-quality stream.
Turn Your Smartphone into a High-End Webcam
Modern smartphone cameras rival expensive DSLRs in video quality. Instead of buying a costly 4K webcam, repurpose your phone. Apps like DroidCam (for Android) and EpocCam (for iOS) allow you to connect your phone to your computer wirelessly or via USB, using it as a high-definition camera. The USB connection is preferred for streaming, as it keeps the phone charged and provides a more stable video feed without lag. For the best image, mount your phone on a stable surface or tripod at eye level, and ensure your camera lens is perfectly clean.
Optimize Your Computer for Stream Stability
A stream that buffers or lags is the fastest way to lose viewers and tips. You can significantly boost your computer's streaming performance without any hardware upgrades. Start by closing all unnecessary background applications and browser tabs. Programs running silently in your system tray (like Spotify, Steam, or updaters) consume valuable CPU and memory. Use your operating system's task manager (Ctrl+Shift+Esc on Windows, Activity Monitor on Mac) to identify and end these resource-heavy processes before you go live.
Clean Up Your Digital Space
A cluttered hard drive can slow down your entire system. Take 15 minutes to clear out temporary files, old downloads, and unused applications. On Windows, use the built-in "Disk Cleanup" tool. On a Mac, offload old files to an external drive or cloud storage. This not only helps your computer run faster but also ensures you have enough free space for recording local videos or storing new content without performance hiccups.
Fine-Tune Your Streaming Software Settings
Free streaming software like OBS Studio (Open Broadcaster Software) is incredibly powerful, but it needs to be configured correctly for your specific hardware. Experiment with the output resolution and frame rate; streaming at 720p (rather than 1080p) often provides a much smoother experience for viewers if your internet upload speed is limited. Use the "Auto-Configuration Wizard" in OBS to let the software suggest optimal settings based on your system's capabilities. This zero-cost adjustment can make a world of difference in stream quality.
Affordable Props and Outfits
You don't need a designer wardrobe or expensive film-quality props to captivate an audience. In fact, viewers are often more drawn to creativity, personality, and unique themes than to high-end lingerie. Here's how to build a versatile collection of outfits and props without breaking the bank.
Thrift Stores: Your Best Friend
Local thrift stores are goldmines for cam models. Look for:
- Lingerie: Many stores have barely-used lingerie for a fraction of retail cost. Wash everything before use.
- Costume Pieces: Vintage slips, robes, corsets, and unique accessories like feathered boas or funky hats.
- Role-Play Items: Look for office wear (blazers, glasses), school-themed items (pleated skirts), or uniforms (nurse scrubs, aprons).
DIY Costumes and Themes
Some of the most memorable shows come from homemade themes. A few ideas:
- Girl/Guy Next Door: Your own casual clothes (oversized sweater, baseball cap) are often the biggest hit.
- Geek/Gamer: A pair of cat-ear headphones, a controller prop, and a graphic tee. Instant appeal to a huge niche.
- Fantasy Creatures: Craft elf ears with modeling clay or make fairy wings from wire and old pantyhose.
- Holiday Themes: Use seasonal items like reindeer antlers, witch hats, or bunny ears purchased from dollar stores after the holiday for pennies.
Repurposing Everyday Items
Look around your home for props that can add context to your scenes:
- Office Stream: Use a stapler, papers, and a desk lamp for an "overtime at the office" setup.
- Reading Nook: A stack of books and some fairy lights creates a cozy, intimate atmosphere.
- Musician: If you have an instrument (even an old ukulele), use it as a prop.
- Food Props: Whipped cream, cherries, or lollipops can be used playfully and are cheap to buy.
Maximizing Versatility
Choose items that can be mixed and matched. A single leather jacket can be part of a "biker" theme, a "rebel" theme, or worn over lingerie for a "bad girl" look. Solid color sheets (from thrift stores) can serve as backdrops for different themes.
Remember: Your viewers are there for you. The props and outfits are just the stage dressing. Authenticity and enthusiasm are the real money-makers. A creative, low-cost setup often feels more genuine and relatable than a sterile, expensive one.
Setting Up Your Space: Privacy and Comfort
Before you even think about cameras or lights, you need to establish a space where you feel safe and can be yourself. Privacy and comfort are the foundation of a successful cam model setup, and the good news is that you don't need a construction crew or a fat wallet to get it right. Here is how to build a professional, cozy environment on a budget.
Privacy on a Dime
If you live with roommates, family, or thin walls, privacy is your number one concern. A dedicated space that is visually and audibly private will help you relax and perform better.
- Room Dividers: You don't need to build a wall. A simple, freestanding room divider or folding screen can carve out a private nook in any room. Check second-hand stores or online marketplaces for cheap finds. A decorative sheet or tapestry clipped to a tension rod can also create a quick visual barrier.
- Blackout Curtains: These are a dual-purpose investment. They block outside light (which ruins video quality) and prevent prying eyes from seeing in. You can find basic blackout curtains at discount stores for very little money. If you are camming during the day, they make the room feel like a private nightclub, which is often the vibe you want.
- The Door Sign: This is free. A simple "Do Not Disturb" sign on your door is essential if you share a living space. Combine this with a strict rule for your housemates: if the red light is on or the door is locked, you are not to be interrupted.
Simple Soundproofing Hacks
Echoey rooms sound amateur, and ambient noise (traffic, neighbors) is distracting. You don't need expensive foam panels to fix this.
- Rugs and Carpets: Hard floors bounce sound around. If you have bare floors, a large rug or carpet drastically reduces echo. It makes the room feel warmer and more intimate on camera, too.
- Soft Furnishings: Thick blankets, tapestries on the walls, and plush pillows absorb sound like professional baffles. They soften the audio and make your space look cozy and inviting. Thrift stores are great for finding cheap blankets and curtains.
- Seal the Gaps: A rolled-up towel placed against the bottom of the door is an old studio trick. It blocks sound from escaping and prevents hallway noise from interrupting your stream.
Designing for Comfort and Performance
You might be in your space for hours. It needs to be comfortable, but also look intentional.
- Declutter Your Background: You don't need a perfect set, but you need a clean one. Viewers should be focused on you, not your laundry pile. A blank wall, a neatly made bed, or a simple backdrop (like a sheet or curtain) works perfectly.
- Seating and Support: Whether you use a chair, a bed, or the floor, ensure you have good support. A cheap back support cushion can save you from pain during long streams. If you sit on the floor, layer blankets and pillows to create a soft, inviting "nest" that looks great on camera.
- Lighting Control: Beyond blackout curtains, think about your light sources. Being able to control the ambient light in your space means you aren't fighting the sun during your streams. This gives you total control over your video quality, even with basic lights.
- Personal Touches: A candle (real or fake for safety), a plant, or a string of fairy lights can add warmth and personality. These small touches make the space feel like yours, which translates to you being more relaxed and authentic on camera.
Remember, your viewers are there for you. They want to see a person who is comfortable and in control of their environment. By taking a few hours to set up your space with privacy and comfort in mind, you are investing in your confidence and your future earnings. A cozy, private sanctuary is the best set you can build.
Promoting Your Stream for Free
Now that your budget setup is ready, it's time to attract an audience without spending a dime on ads. Free promotion is all about leveraging existing communities and being consistent with your efforts.
Leverage Social Media
Twitter (X): This is the cam model's best friend. Create a separate model account and post daily. Share teaser photos, your streaming schedule, and behind-the-scenes content. Use relevant hashtags like #camgirl, #webcammodel, or #nsfw to get discovered. Engage with other models and retweet their content to build a supportive network.
Reddit: Reddit can drive massive traffic if used correctly. Find subreddits related to your niche (e.g., r/gonewild, r/nsfw, or specific fetish communities). Read each subreddit's rules carefully before posting. Most allow promotional content as long as you are an active community member. Post high-quality photos or gifs and include a link to your cam site in your profile bio.
Engage in Cam Site Communities
Don't just broadcast and log off. Many cam sites have internal forums, fan clubs, or social feeds. Be active in these spaces. Comment on other models' profiles, participate in site-wide events, and use the site's internal broadcasting feature to update your status when you go live. This builds familiarity and keeps you on viewers' radar.
Collaborate with Other Models
Collaboration is a powerful free marketing tool. Partner with another model for a joint stream. This exposes you to their entire audience, and vice versa. It also creates fresh content that can excite both of your regular viewers. Look for models with a similar style or niche to ensure the collaboration feels natural.
Build a Recognizable Brand
Your brand is what sets you apart. It doesn't require a logo designer or expensive software. Pick a consistent username across all platforms. Choose a color scheme or a specific vibe (e.g., girl-next-door, goth, glam) and stick to it. When viewers see the same aesthetic across your stream and social media, they will remember you more easily.
Master Your Schedule
Consistency is key to visibility. Stream at the same times each week so viewers know when to find you. If your hours vary, use free tools like Google Calendar to post your schedule on your social media. During your streams, remind people to follow you on Twitter or turn on notifications so they never miss a show.
By combining these free strategies, you build momentum without touching your budget. The audience you grow through these methods is often more loyal, as they feel a personal connection to you beyond just the stream.
Conclusion: Start Simple, Upgrade Gradually
As you embark on your camming journey, remember that the most important assets you bring to the screen are your personality, energy, and authenticity. While high-end gear is nice to have, it is not a prerequisite for success. The viewers tune in for you, not your camera model. Starting with a simple, budget-friendly setup allows you to test the waters, discover what works for your unique style, and begin earning without the pressure of a large upfront investment.
The key to long-term growth is reinvestment. As your earnings start to come in, you can gradually upgrade your equipment one piece at a time. Maybe next month you invest in a better webcam, and the month after that, a softbox lighting kit. This approach not only makes high-quality gear financially accessible but also ensures that every purchase is a calculated upgrade that will genuinely enhance your broadcast.
Above all, consistency is king. A regular schedule and genuine interaction with your audience will always outweigh having the most expensive microphone or 4K camera. Focus on building a loyal fanbase, and the tools will follow.
Minimum Viable Setup Checklist:
- A computer or laptop with a stable internet connection (Ethernet cable recommended).
- A 1080p webcam (like the Logitech C920 or similar budget option).
- Ample natural light or a simple ring light/desk lamp.
- A clean, organized background.
- Free broadcasting software (like OBS Studio).
- Registered accounts on your chosen camming platforms.
Now, go ahead and hit that "Go Live" button. Your audience is waiting!